


Steps to integrate in-App Purchase in iPhone Application
Aug 2015


Many applications help you get additional contents and features by purchasing. This is known as In-App Purchases. You can get additional materials if you purchase it through them.
It has been proven that most of the revenue earned by the developers came from In-App Purchases. IAP has great tools for the developers and users. The developers can sell their apps in the App Store for free, enabling some features to get the users’ attention. They can incorporate IAP to open additional content after purchasing it. The users can also purchase only the content and features they like; they need not pay the parts of the apps that they don’t like.
IAP is divided into four categories:
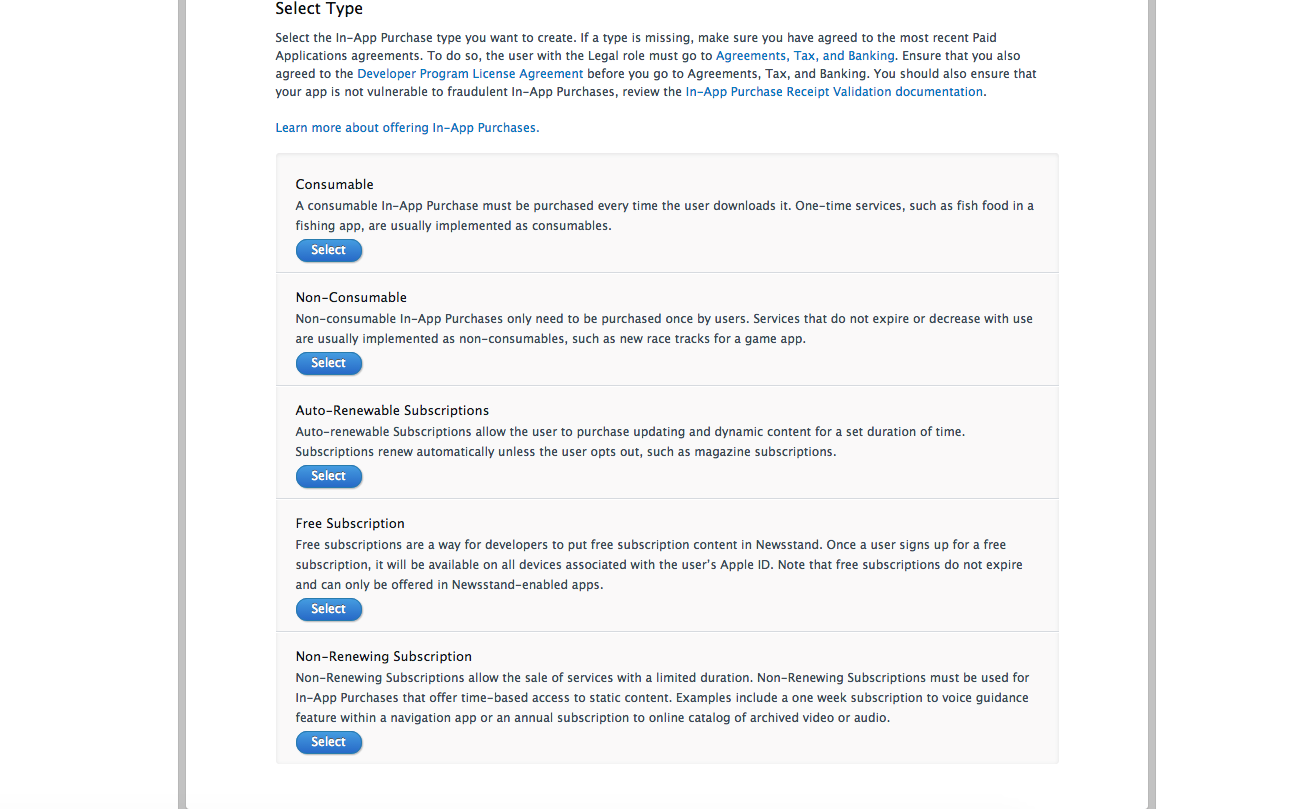
1) Consumable product can be purchased many times. Example of this product is the extra lives for the hero of a particular game. The extra lives are the consumable products that you can purchase. It will last over a short period of time. This product does not have a permanent effect.
2) Non-Consumable product can only be purchased once. After purchasing this product, it will always be there for you to use forever.
3) Renewable Subscriptions, requires the user to renew it from time to time. It has an expiry date.
4) Non-renewable Subscription has a one-time subscription, which will also expire.
After knowing the different categories, you’re ready to integrate IAP in your application. The process is easy. These include the following steps:
1) Arrange the basic project in Xcode
2) Build In-App Purchase products list in the iTunes Connect portal
3) Add code to get the IAP information from Apple and make payments
While you’re still in the initial stage of development, you have to remember the right way to test IAP. You should use a real Apple ID. You should not pay real money for the services or products that you’re still developing. You can work in a sandboxed mode by creating and using the test users in the iTunes Connect platform during the development period. This will allow you to do extensive testing on your IAP without paying a single centavo.
Get ready to try/test the demo app on a real device. You cannot purchase using a simulator even if you get the IAP product details and show them in the app.
Before writing the first line of code to the application, follow some steps that should be done in Xcode. The required frameworks will be included in the project and the needed configuration will be performed by Xcode. These are simple steps to follow, however, you have to consider doing these two distinct tasks: To allow IAP in your project and to set a legal iOS developer account.
To set a legal iOS developer account, open the starter project in Xcode. After launching, click the project target in the Project Navigator. Going to the General Tab and then to the Identity Section, click the Team Dropdown control and choose your developer account.
If you have not yet added your developer account to the Xcode, you can follow the following steps:
1) Go to the menu and open the Xcode>Preferences
.jpg)
2) Click the Accounts Tab
.jpg)
3) Go to option, Click a small button found at the bottom left side and select the Add Apple ID
.jpg)
.jpg)
4) Enter your Apple ID and Password to the Modal Window then Click add. After which, your developer account will be displayed. You can now set a valid Team Value for the project.
.jpg)
Your next step is to allow the IAP to your application. Since the Project Target has already been set to the Project Navigator Panel, click the Capabilities Tab. From there, check on the Capabilities List, look for the IAP and turn it on. You now have a new AppID for the project.
The next step is to use a browser to perform some work to the iTunes Connect Portal. Use the link http://itunesconnect.apple.com/ where you will have to sign in using your ID.
After signing in, create one or more test user. You will use the test user during the app testing so that you will be making your purchases on a sandboxed environment using the virtual money. Remember, you don’t have to pay real money in purchasing while you’re in the development stage. You have to use virtual money to test if your app is really working properly.
After connecting to the iTunes Connect Platform, Click the Users and Roles link so that you will be able to go to the proper area where you will organize the test user.
There are three links to consider:
-
iTunes Connect Users
-
TestFlight Beta Testers
-
Sandbox Testers
Choose the third link; click it to allow you to manage the test users. If you have already added the test users before, you will be able to see it in the list.
Follow the below steps to create testing account.
Firstly login to your Apple Developer account from the following link.
https://itunesconnect.apple.com/WebObjects/iTunesConnect.woa
# After login to your Apple Developer account Please select “Users & Roles”. Refer the below image:
.jpg)
# After the same click on the “+” button to add “iTunes Connect Users”. Refer the image below.
.jpg)
# Now add all the requested information in “Add iTunes Connect User” page:
.jpg)
#Now select the roles whether it is Admin, Technical, Finance, Sales or Marketing. And after selecting the roles, the “Next” button from very right hand side will be enables. Click on the same.
.jpg)
# Now refer the given image below and select the necessary fields as per the requirements and than click to the “Save” button.
.jpg)
You can now create a new test user. Going to the top-left side portion of the browser, next to the Testers title, you can see a blue plus button. Click the button and you’ll be directed to a new page where you will enter all test users’ data. Be sure to fill in all the required fields to be able to save the user. The email does not have to be real; it should not also be an email address that has already been used a couple of times. You will also be able to see the new test user on the list.
After creating the test user, create a new app record that you will connect to the application by using the AppID previously created. You will also perform IAP related configuration.
Going to the iTunes Connect Platform and considering that you are still in the users’ page, click the Users and Roles link that is on the top-left side. Click the My Apps link from the popup options. This will lead you to the app records page.
At the top-left side, you’ll see a big plus button, click it and choose the new iOS App option so that you can create a new app record.
A Modal Window will appear where you have to fill in all the information about the new app; choose a unique name for the app.
You should also take care of the Bundle ID of the app. Going to the dropdown menu; you have to select the right AppID that will match the project that you’re creating. You will connect this new app record to the under-develop demo app.
Set a main language that you will use in the app, set a version number and then set the SKU value for the app. Click the create button and view the app details. Click also the IAP to create two new IAP records.
Click the Create New Button at the top-left corner. You have to select the right type for the new IAP. Click the select button in the consumable section.
In the Reference Name field set a string value that you will use as reference inside the iTunes Connect Portal. Type a unique string in the product ID that will remind you the current IAP record.
Choose a price range, scroll down to set more IAP data. You also have to set the title and description by clicking the Add Language button. In selecting the language, set “Extra Colors Collection 1” as the title and for the description, set the “Extra Colors for Drawing (Green and Blue). Save the language and the IAP record.
You have already created the extra color collections for your app. If you purchase the first, the green and blue colors will be opened and if you purchase the second, the black and gray colors will also be opened.
You can now write some code. Open the IAPurchaseViewControllr.Swift file by hitting the Project Navigator panel; declare the couple arrays. In the productIDS, add the product ID values to the IAP record you have created in iTunes Connect platform. The contents of the array will be used to get the data you’re looking from the Apple’s servers. The productsArray will be used after matching records have been recovered.
You’re now set to request and get product info. Use the new method requestProductInfo. You will also need the SKProductRequest. You use the SKProductsRequest class and prepare the ProductRequest object. After preparing the ProductRequest object, you can initiate the request.
The response parameter contains “products”. It is considered an array and each item is SKProduct object which contains info for the IAP product that was created in the iTunes Connect. If you’re already sure that the response actually contains the product objects, you can add them to the productsArrayarray. You will then have to reload the tableview data.
After the tableview has been reloaded, you can test the app and try the first In-App Purchase feature. After the IAP products have been listed in the tableview, you can now purchase any apps on the list. The eBuy button is used to start purchasing.
We hope that after this informative article on “How to integrate In App Purchase in iOS applications”, your maximum queries has been solved about iPhone Application Development India. If we talk about the forte' of Hyperlink Infoystsem than iPhone App Development India is one of them. The finest quality and the best features and functionality are the proof of our dexterity. To Experience the best services from our experts, Hire iPhone App Developer and know the difference of our world class mobile applications. Contact us for more information.

Harnil Oza is the CEO & Founder of Hyperlink InfoSystem. With a passion for technology and an immaculate drive for entrepreneurship, Harnil has propelled Hyperlink InfoSystem to become a global pioneer in the world of innovative IT solutions. His exceptional leadership has inspired a multiverse of tech enthusiasts and also enabled thriving business expansion. His vision has helped the company achieve widespread respect for its remarkable track record of delivering beautifully constructed mobile apps, websites, and other products using every emerging technology. Outside his duties at Hyperlink InfoSystem, Harnil has earned a reputation for his conceptual leadership and initiatives in the tech industry. He is driven to impart expertise and insights to the forthcoming cohort of tech innovators. Harnil continues to champion growth, quality, and client satisfaction by fostering innovation and collaboration.
Latest Blogs


Is BlockChain Technology Worth The H ...
Unfolds The Revolutionary & Versatility Of Blockchain Technology ...


IoT Technology - A Future In Making ...
Everything You Need To Know About IoT Technology ...
Feel Free to Contact Us!
We would be happy to hear from you, please fill in the form below or mail us your requirements on info@hyperlinkinfosystem.com
Hyperlink InfoSystem Bring Transformation For Global Businesses
Starting from listening to your business problems to delivering accurate solutions; we make sure to follow industry-specific standards and combine them with our technical knowledge, development expertise, and extensive research.
4500+
Apps Developed
1200+
Developers
2200+
Websites Designed
140+
Games Developed
120+
AI & IoT Solutions
2700+
Happy Clients
120+
Salesforce Solutions

40+
Data Science