


Q-SYS A Queue Management System
- An IoT-based Queue Management System
Queue management system Q-SYS helps organizations such as banks, passport offices, hospitals, and more to manage the queue based on a token system. The visitors will be able to get the token generated by the system based on their services. The organization can opt to announce the token number on the premises through the digital screen. After generating the token the system will reflect the current serving token number on the counter screen along with the description and text ad the organization wants to telecast. Q-SYS allows the organization to manage its admin panel, operator panel, and entire token system through one single solution.
Client Requirements
The client wanted a queue management system that can help various organizations to manage their visitors in real-time. The main requirement was to provide an IoT-integrated system that can help the organizations such as banks, hospitals, customer care centers, and more to manage the queues of visitors and resolve their queries in an effortless and chaos-free manner.
Along with generating the tokens, the client wanted to have three different dashboards for the company, operators, and admin to manage the entire queue management system starting from generating tokens to serve them, managing the different departments, and various other things that can not only digitize the queue management system but will also enhance the service offering of the organization.
The client wanted an enhanced solution that any organization with real-time visitors can use to manage their real-time visitors on different branches of different departments with various different customization options. The system should be able to display the token number on the counter screen and should be able to announce the token number based on the organization's preferences along with offering current updates about the token status to the users through SMS, email, or WhatsApp.

From Inception to Success - Watch the Whole Story!
Account Setup Configuration Process
Users can follow mentioned simple setup configuration process to create the account to access Q-SYS. Users should enter the database details such as hostname, port name, name, username, and password. After that users can follow the mentioned process or create an account effortlessly which includes various steps such as company role selection, application timezone setup, and more to complete phase 1 of the account creation process.
After successfully completing phase 1 of the account creation process the user can move on to phase 2. In phase 2 the user will be able to verify the license. After successfully completing the verification process, the client can create their company admin account. Set the Laravel-based NPM echo server to announce the tickets.
Features
Company Admin Panel
Company Dashboard
The company admin can view the stats of total issued tokens, completed tokens, tokens on hold, skipped tokens, and incomplete tokens for different clusters, branches, departments, and services. By default, the company admin will get the data of the current date but they can reset the data, filter them and refresh the dashboard based on their requirements. The company admin can print and export the data in PNG, JPG, and PDF format. The company admin can customize the dashboard by changing the color scheme, layout style, Navbar Style, and more.
Branch Information
The company admin can view data containing branch name, total issued token, total completed tokens, in queue tokens, no-show tokens, hold tokens, avg waiting time, average service time, average deferred time, average skip time, average turnaround time, and more of all the registered branches.
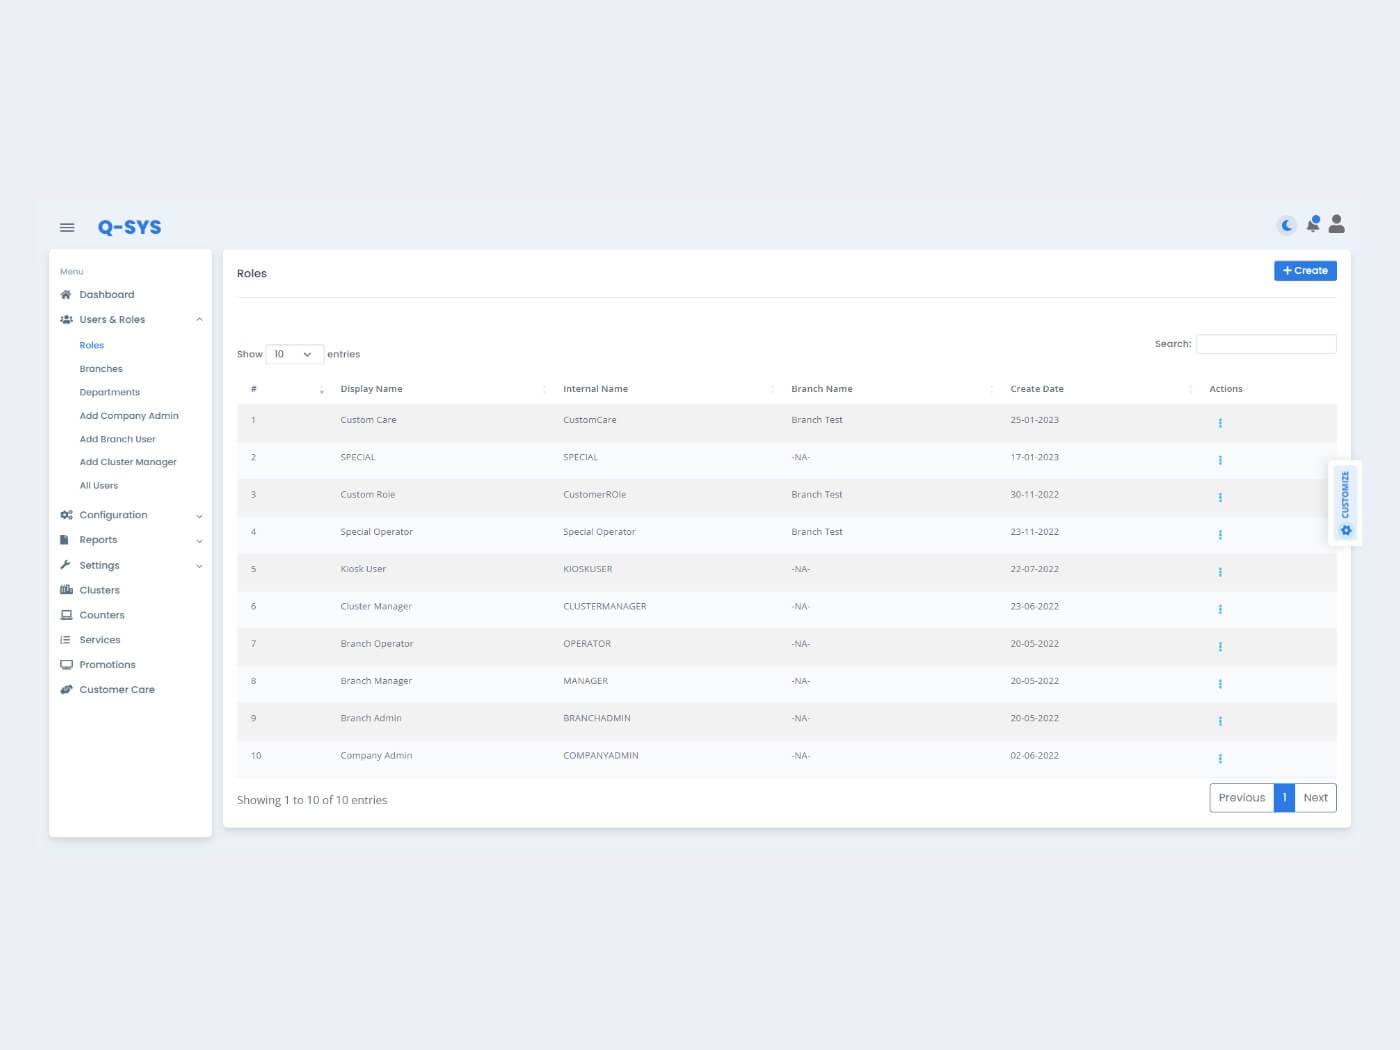
User Roles
The company admin can view, add, update, and delete the company roles along with the details such as display name, internal name, branch name, and more. Users can restrict their usage rights based on their profile.
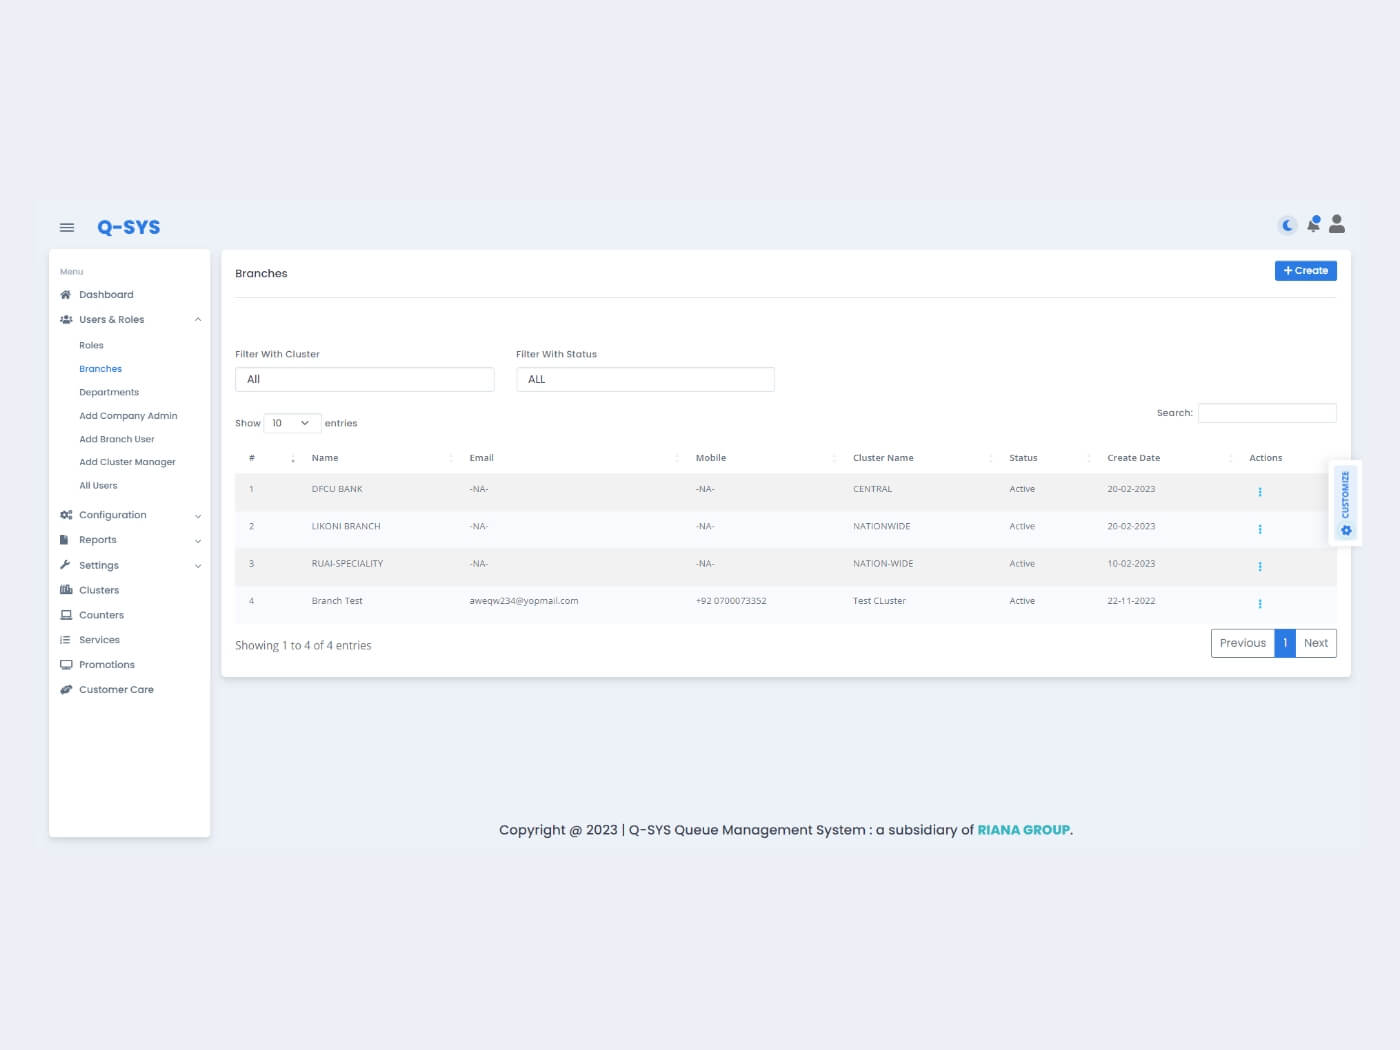
Branches
The company admin can view, add, update, and delete the company branches along with the details such as branch name, email address, mobile number, cluster name, status, and more. The company admin can activate and deactivate the branch. The company admin can manage the branch settings along with the details such as email settings, SMS settings, Whatsapp settings, Customer API settings, and more. The company admin can filter the branch details based on cluster and active status.
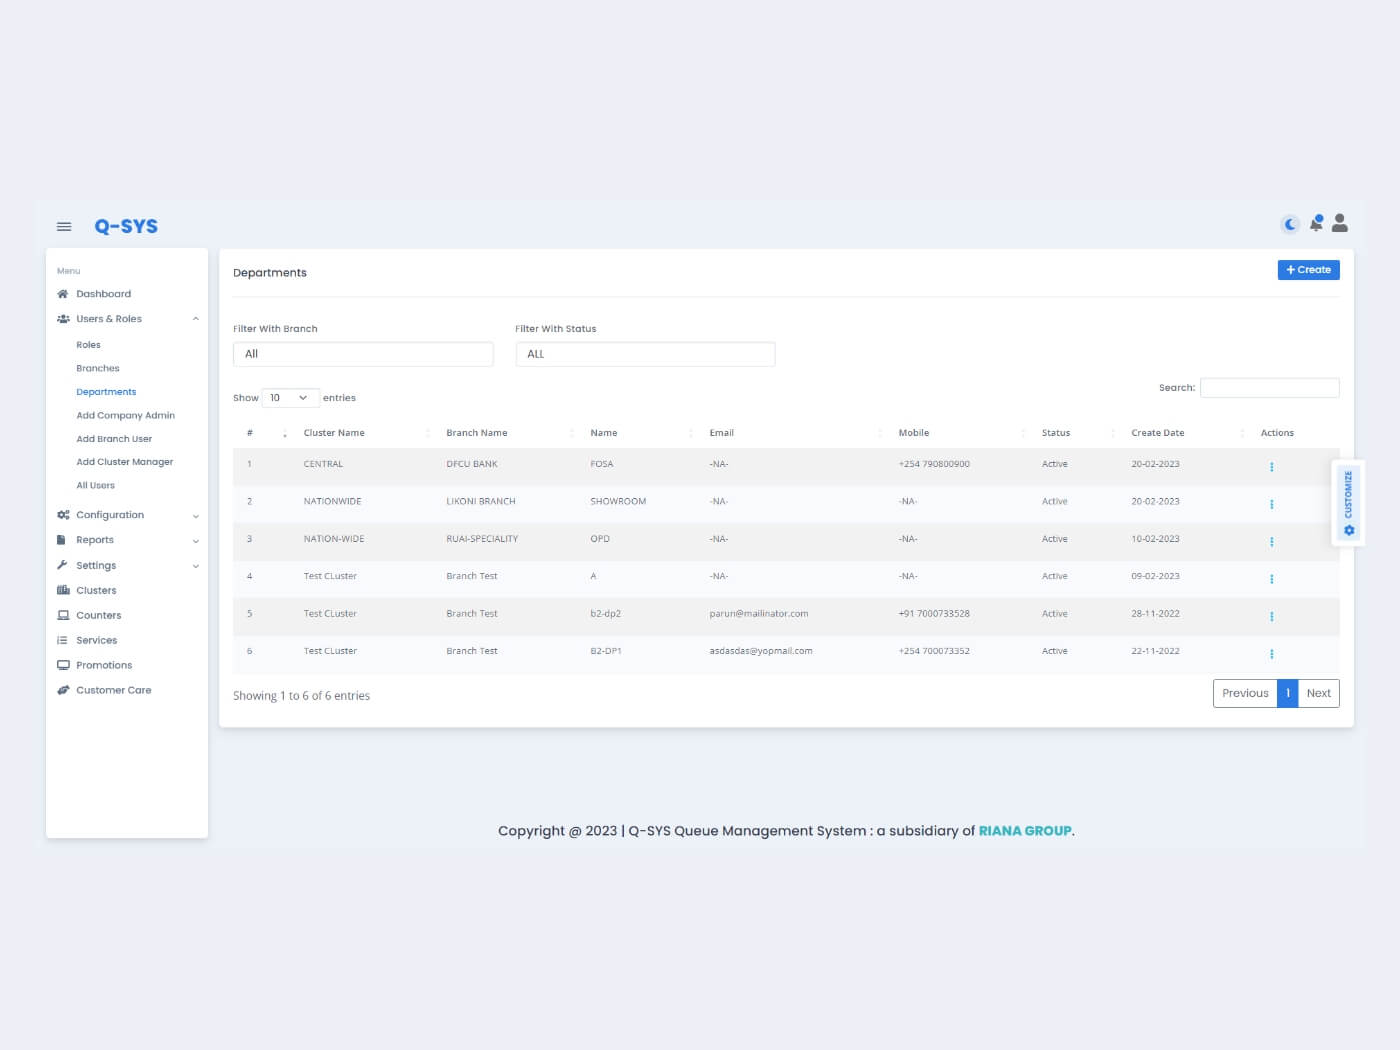
Departments
The company admin can view, add, update, and delete the different departments for different branches along with the details such as cluster name, branch name, department name, email address, mobile number, status, and more. The company admin can activate and deactivate the specific department based on their requirements. The company admin can filter the department details based on branch and active status.
Department Master Display
The company admin can view the master display of the department along with the details such as the number of counters, current running token, and current playing advertisement.
Company Admin Profile Creation
The company admin can add other admin profiles by entering basic details such as first name, middle name, last name, username, email address, mobile number, Password, and more.
Branch User Profile Creation
The company admin can create branch admin profiles by entering basic details such as branch name, user role, first name, middle name, last name, username, email address, mobile number, Password, and more.
Cluster manager Profile Creation
The company admin can create cluster manager profiles by entering basic details such as cluster name, first name, middle name, last name, username, email address, mobile number, Password, and more.
Users
The company admin can view, update and manage all the system users along with the details such as name, Email address, username, role, branch name, status, and more. The department admin, Cluster admin, and branch admin can view, update and manage the system users along with the details such as name, Email address, username, role, branch name, status, and more of their respective department, cluster, and branch. The admin can activate and inactivate specific user profiles as well.
Master Display Configuration
The company admin or department admin can add, update, manage, and view the master display along with the details such as Company Logo, Branch Name, Department Name, Upcoming page, record, Timing Content, and more.
Master Display Creation
The admin can create the master display by entering basic details such as branch name, department name, font size, header color, background color, advertisement details, and more. The admin can set the configuration to announce the token number for a specific counter.
Token Configuration
The company admin or department admin can add, update, manage, and view the token configuration along with the details such as Company Logo, company name, branch name, font size, printing options, message to display on token Department Name, Upcoming page, record, Timing Content, and more.
Token Creation
The admin can create tokens by entering basic details such as branch name, company name, prefix, text font size, text font color, message, and more. The admin can upload the company logo and opt to print the token or not based on their requirements. The admin can set the configuration to announce the token number for a specific counter.
Kiosk Display Configuration
The company admin or department admin can add, update, manage, and view the kiosk display configuration along with the details such as branch name, Company Logo, background image, message to display, and more.
Kiosk Display Creation
The admin can create and customize the Kiosk by entering basic details such as branch name, service border color, service shadow color, service background color, service text color, service-text font size, and more. The admin can opt to upload the company logo and background image and add a message as per their requirements.
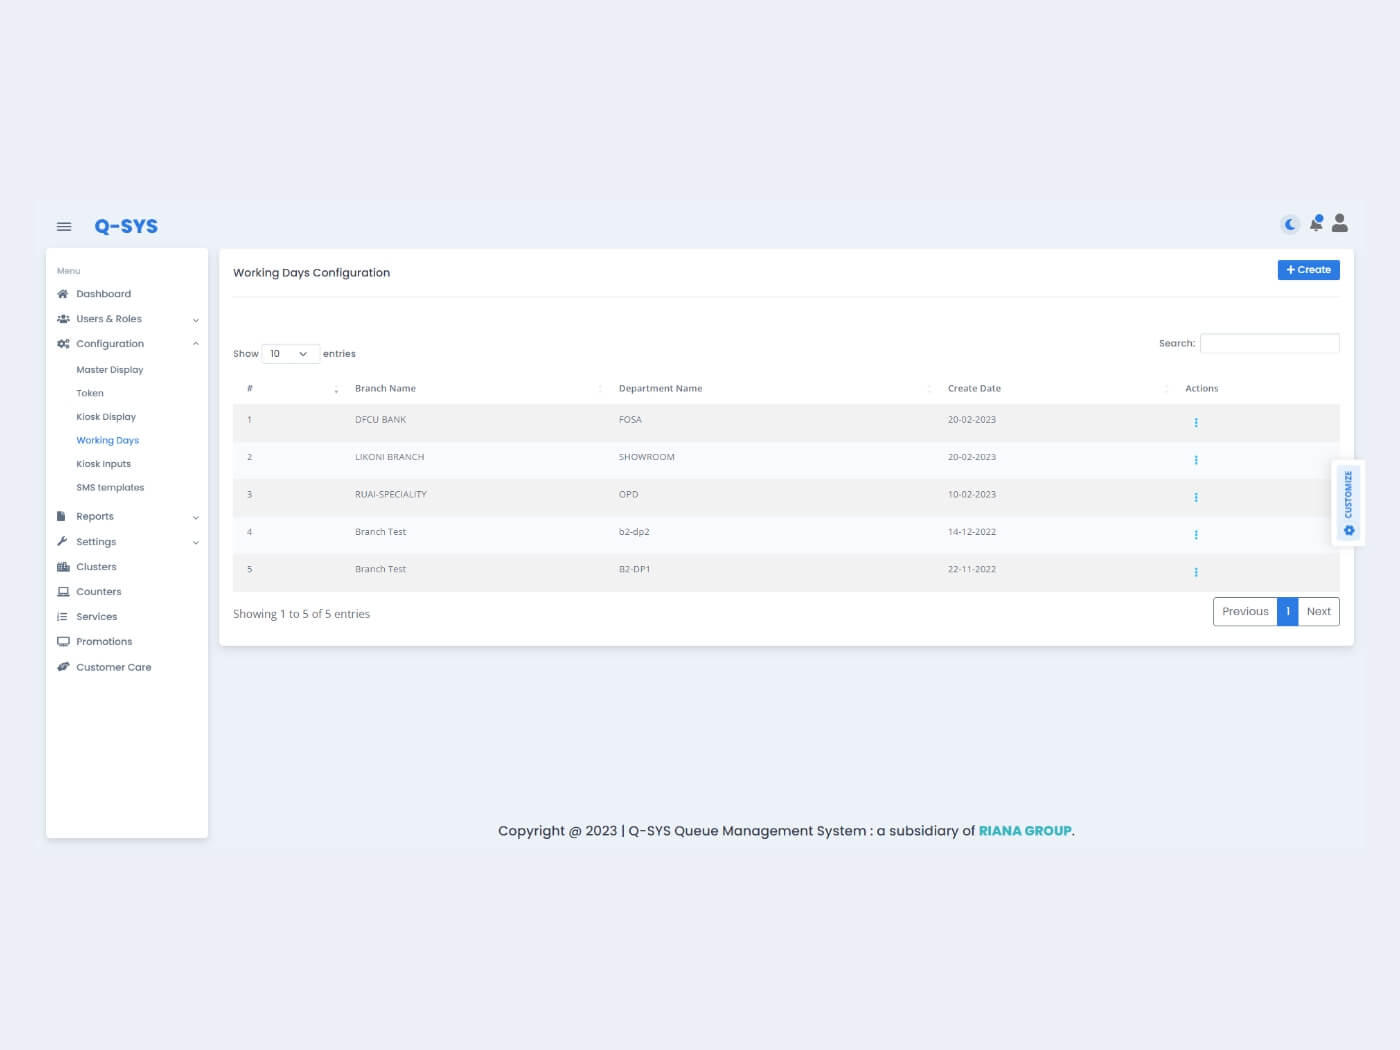
Working Day Configuration
The company admin or department admin can add, update, manage, and view the status of working days along with the details such as branch name, department name, total working days, start time and end time based on working days, and more.
Working Day Creation
The admin can add working days manually by entering basic details such as branch name, department, working day, start and end time, and more.
Customer Inputs Configuration
The admin can customize the customer input configuration to create a customer form for the kiosk along with the details such as form name, first name, last name, mobile number, ID number, and so on. The admin can take various actions such as whether to show the input on Kiosk and whether it is mandatory to add the details based on their requirements.
SMS Template Creation
The admin can create a dynamic SMS template to send notifications about the status of the token for different stages such as token creation, token call, token hold, token skip, and token close for the customers to customers along with basic details such as branch name, department name, message to send for different token status, message for token alert, token status and more.
SMS Template Configuration
The admin can view and edit the SMS template details to send notifications about the status of the token for different stages such as token creation, token call, token hold, token skip, and token close for the customers to customers along with basic details such as branch name, department name, creation date, token message, and more.
Summary Reports
The admin can generate summary reports by entering details such as department, year, month, start date, and end date for token information. The admin can get the reports in stats formation containing details of total issued tokens, completed tokens, in-queue tokens, skipped tokens, and on-hold tokens for the given timeline. The admin can get the reports in list formation containing details such as department name, total issued tokens, completed tokens, in-queue tokens, skipped tokens, on-hold tokens, average service time, average waiting time, average hold time, average skip time, and an average turn around time for the given timeline. The admin can export the data in PNG, JPG, CSV, and PDF format.
Customer Reports
The admin can generate customer reports by entering details such as department, year, month, start date, and end date for customer information. The admin can get the reports in list formation containing details such as visit date & time, service rendered, customer name, customer email address, and mobile number for the given timeline. The admin can export the data in PNG, JPG, CSV, and PDF format.
Cluster Reports
The admin can generate cluster reports by entering details such as department, year, month, start date, and end date for cluster information. The admin can get the reports in stats formation containing details of total issued tokens, completed tokens, in-queue tokens, skipped tokens, and on-hold tokens for the given timeline. The admin can get the reports in list formation containing details such as cluster name, branch name, department name, total issued tokens, completed tokens, in-queue tokens, skipped tokens, on-hold tokens, average skipped time, average waiting time, average service time, average hold time, and an average turn around time for the given timeline. The admin can export the data in PNG, JPG, and PDF format.
Token Journey
The admin can generate token journey reports by entering details such as department, year, month, start date, and end date for token information. The admin can get the token information in stats formation containing details of total issued tokens, completed tokens, in-queue tokens, skipped tokens, and on-hold tokens for the given timeline. The admin can get the reports in list formation containing details such as date, issued time, token number, assigned counters, offered service, token action, and total service time for the given timeline. The admin can export the data in PNG, JPG, CSV, and PDF format.
Counter Reports
The admin can generate counter reports by entering details such as department, year, month, start date, and end date for counter information. The admin can get the token information in stats formation containing details of total issued tokens, completed tokens, in-queue tokens, skipped tokens, and on-hold tokens for the given timeline. The admin can get the reports in list formation containing details such as date, department, counter number, operator name, login time, logout time, total service time, average service time, average waiting time, and total transaction for the given timeline. The admin can export the data in PNG, JPG, and PDF format.
Department Operation Reports
The admin can generate department operations reports by entering details such as department, year, month, start date, and end date for department operation information. The admin can get the reports in stats formation containing details of total issued tokens, completed tokens, in-queue tokens, skipped tokens, and on-hold tokens for the given timeline. The admin can get the reports in list formation containing details such as date, department, service, total issued tokens, completed tokens, in-queue tokens, skipped tokens, on-hold tokens, average waiting time, and average service time, for the given timeline. The admin can export the data in PNG, JPG, and PDF format.
Operator Reports
The admin can generate operator reports by entering details such as department, year, month, start date, and end date for operators' information. The admin can get the reports in list formation containing details such as date, operator name, counter name, service name, login time, logout time, total active time, total transactions, total completed tokens, total skipped tokens, average waiting time, average service time, average hold time, and average skip time for the given timeline. The admin can export the data in CSV and PDF format.
TAT Benchmark reports (Turn Around Time Benchmark reports)
The admin can generate TAT benchmark reports by entering details such as department, year, month, start date, and end date to get accurate information about how much time a particular service can take. The admin can get the reports in list formation containing details such as service name, TAT time, total transaction, and TAT within a benchmark of 0-5 min, 5-15 minutes, and above 15 minutes for the given timeline. The admin can export the data in PDF format.
Employee Log Reports
The admin can generate employee log reports by entering details such as role, year, month, from date, and to date to get employee log information. The admin can get the reports in list formation containing details such as employee name, role, current status, login time, logout time, and last activity for the given timeline. The admin can export the data in CSV and PDF format.
Company Settings
By default, the system will get the company details from the cloud. The admin can edit the company settings along with the details such as name, code, email address, phone number, and so on.
Kiosk Touch Screen Language Configuration
The admin can add, update, view, and manage the Kiosk Touch Screen Language Configuration along with the details such as Sr. number, language name, and language abbreviation to display on the Kiosk touch screen.
Priority Customers
The admin can view, edit and delete the list of priority customers along with the details such as mobile number, email address, unique ID, and create date.
Priority Customer Creation
The admin can prioritize the premium customers by entering their details such as email address, mobile number, and unique ID manually or uploading the CSV file from their system.
Database Backup
The admin can take the database back up manually and automatically as well. The admin can download the database manually whenever they need want. The admin can Set Auto Backup Time by entering the day, time, and path to download the database automatically.
General Settings
The admin can set the auto logout time, token list refresh time, default country code, notification number, Announcement Language, logo image, background image, and terms and conditions for the operator dashboard.
Clusters
The admin can add, update, delete, and manage the clusters along with the details such as cluster name and active or inactive status.
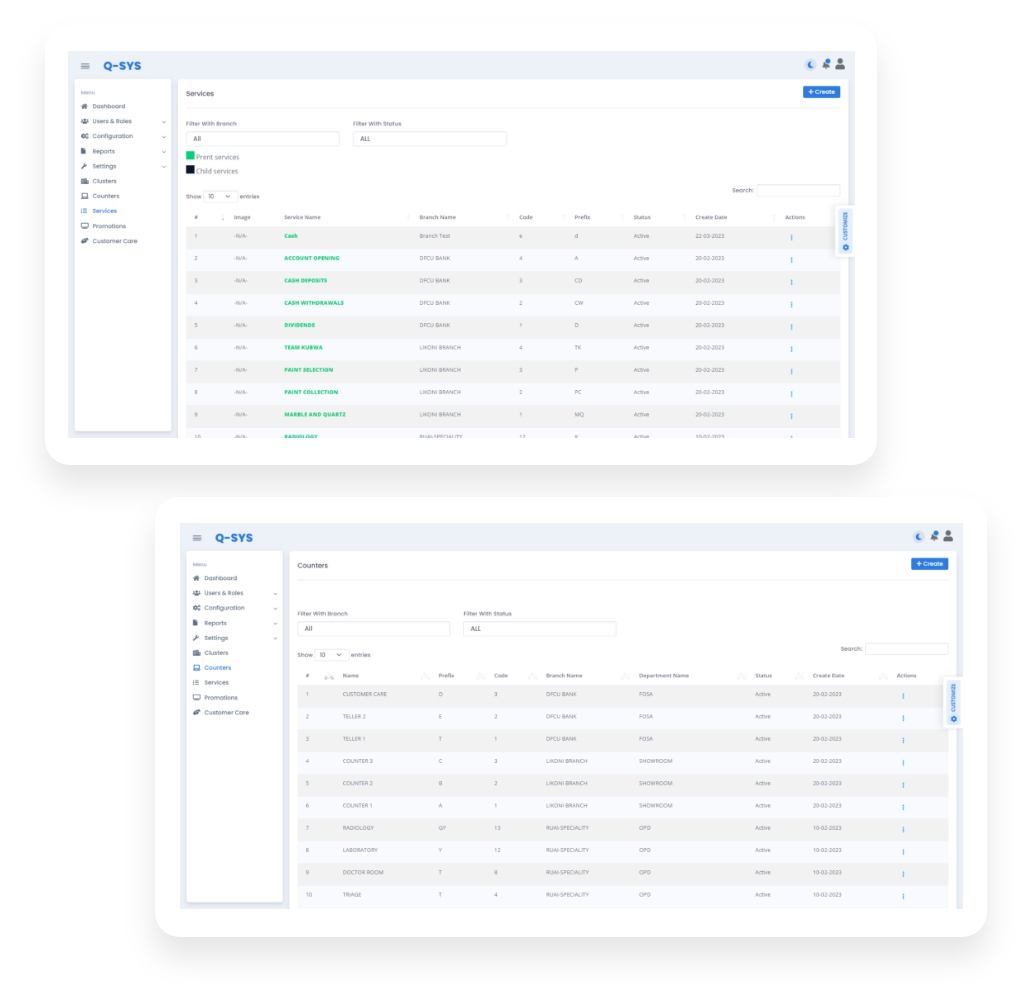
Counters
The admin can generate counter reports by filtering them by branch and active or inactive status. The admin can view, edit and delete the counters along with the details such as name, prefix, code, branch name, department name, status, and create date. The admin can assign different services and sub-services to the specific counter. The admin can view the LCD display for the specific counter.
Counter Creation
The admin can create the counter by entering details such as branch, department, counter name, prefix, code, and active or inactive status.
Counter LED Configuration
The admin can enter the counter LED configuration details for the specific counter which includes the counter number, LED ID to display the token number, and text color.
Services
The admin can generate service reports by filtering them by branch and active or inactive status. The admin can view the font color green for the parent service and black for the child service. The admin can take various actions such as view, edit, delete, change status, language specification, and add inputs for specific services.
Service Creation
The admin can create the service by entering the details such as branch, department, parent service, display name, prefix, print name, wait time limit, transaction time limit, TAT time limit, manager alert time, token limit, service announcement option, service prioritization, active or inactive status, transfer token color, the option to display service on the kiosk, and service code. The admin can add sub-services with the capacity to add max 7 layers for the specific service category.
Promotion Creation
The admin can create the advertisement to display on the kiosk by entering the details such as branch, department, text, text color, background color, font size, font size, start date, end date, and promotion type.
Promotion Module
The admin can view, edit and delete the promotions along with the details such as branch name, department name, promotion type, start date, end date, and creation date.
Customer care
The admin can filter the customer details based on department, date, and token number. The admin can view, print and prioritize the token along with the details such as date, token number, counter details, token issues time, customer name, mobile number, remarks, and token status.
Token Creation
The admin can create the token for the customers by entering the details such as language, services, first name, last name, email address, and notification type to resolve any kind of issues in the customer care panel.
Department Dashboard
The department admin can view the stats of total issued tokens, completed tokens, tokens on hold, skipped tokens, and incomplete tokens of their department only. By default, the department admin will get the data of the current date but they can reset the data, filter them and refresh the dashboard based on their requirements. The department admin can print and export the data in PNG, JPG, and PDF format. The company admin can customize the dashboard by changing the color scheme, layout style, Navbar Style, and more.
Cluster Dashboard
The cluster admin can view the stats of total issued tokens, completed tokens, tokens on hold, skipped tokens, and incomplete tokens of their cluster only. By default, the cluster admin will get the data of the current date but they can reset the data, filter them and refresh the dashboard based on their requirements. The cluster admin can print and export the data in PNG, JPG, and PDF format. The cluster admin can customize the dashboard by changing the color scheme, layout style, Navbar Style, and more.
Branch Dashboard
The branch admin can view the stats of total issued tokens, completed tokens, tokens on hold, skipped tokens, and incomplete tokens of their branch only. By default, the branch admin will get the data of the current date but they can reset the data, filter them and refresh the dashboard based on their requirements. The branch admin can print and export the data in PNG, JPG, and PDF format. The branch admin can customize the dashboard by changing the color scheme, layout style, Navbar Style, and more.
Notification
The branch managers can get notifications about exceeded manager alert time along with the details such as date, token number, Operator name, counter number, and more for their own branch only.
Colors & Typography
Aa
Poppins
Aa Bb Cc Dd Ee Ff Gg Hh Ii Jj Kk Ll Mm Nn Oo Pp Qq Rr Ss Tt Uu Vv Ww Xx Yy Zz
For Customers
Features
Operator Dashboard
Login
The operator can log in to the system by entering the details such as username, password, department, and counter based on their preferences.
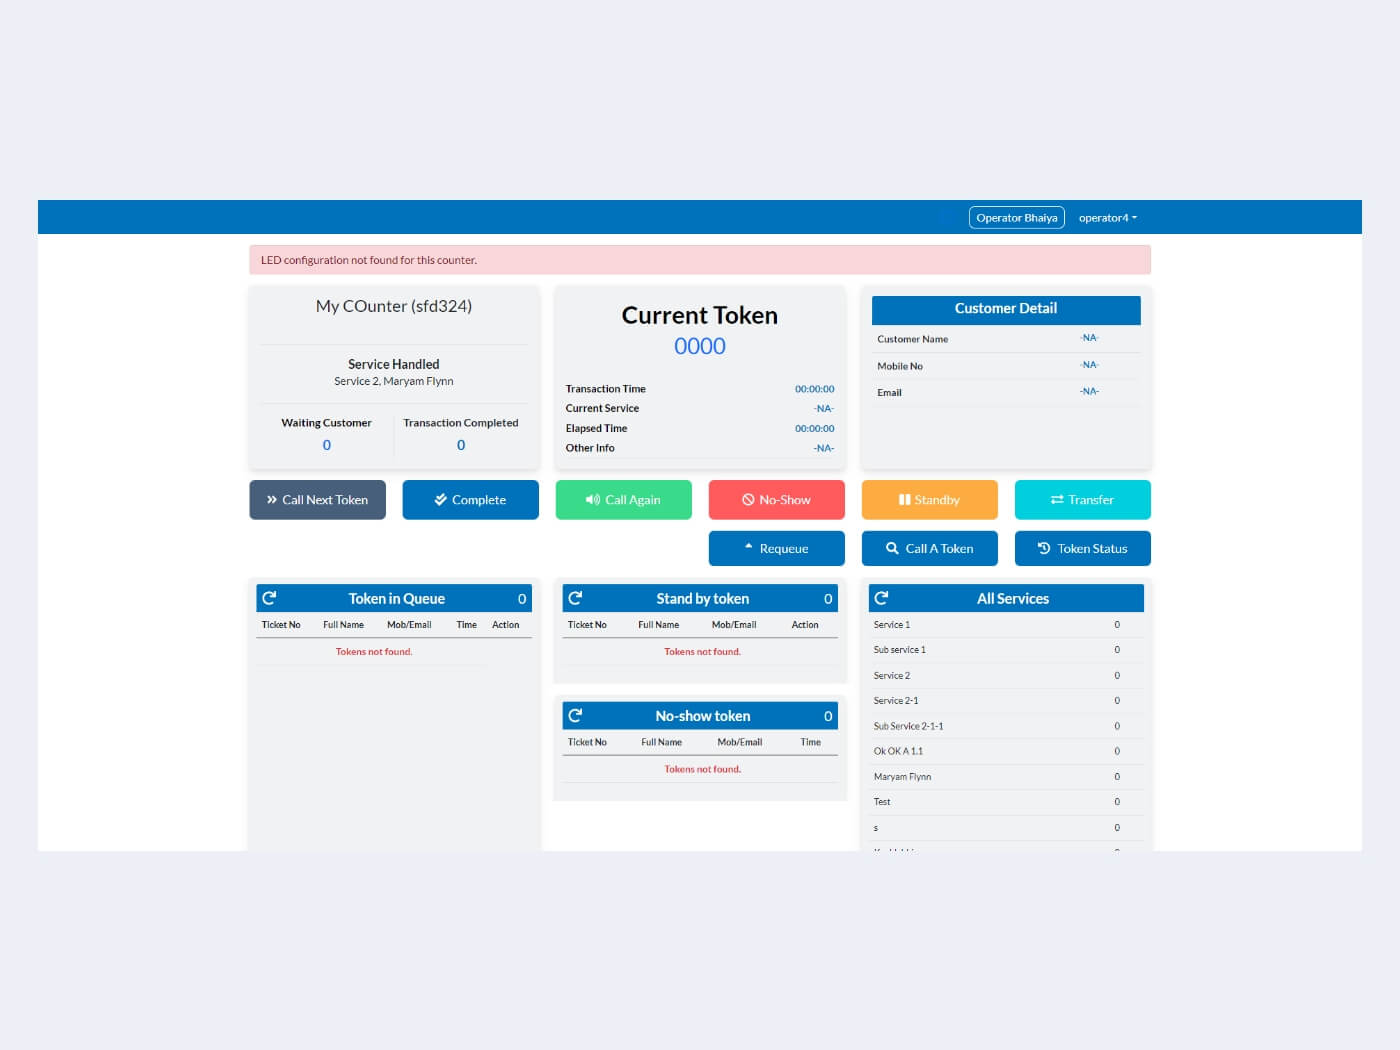
Dashboard
The operator will get the dashboard containing the details such as the name of the operator, counter specification, current token details, customer details, tokens in the queue, stand-by tokens, all services and more based on their selection of the counter.
Counter Specification
The operator can view various specifications such as counter number, service handled, language specification, customers in waiting, transaction completed, and so on to display on the Kiosk. The operator can take actions such as taking a break, completing the current active token, calling the next token, and so on for their specific counter.
Current Token Specification
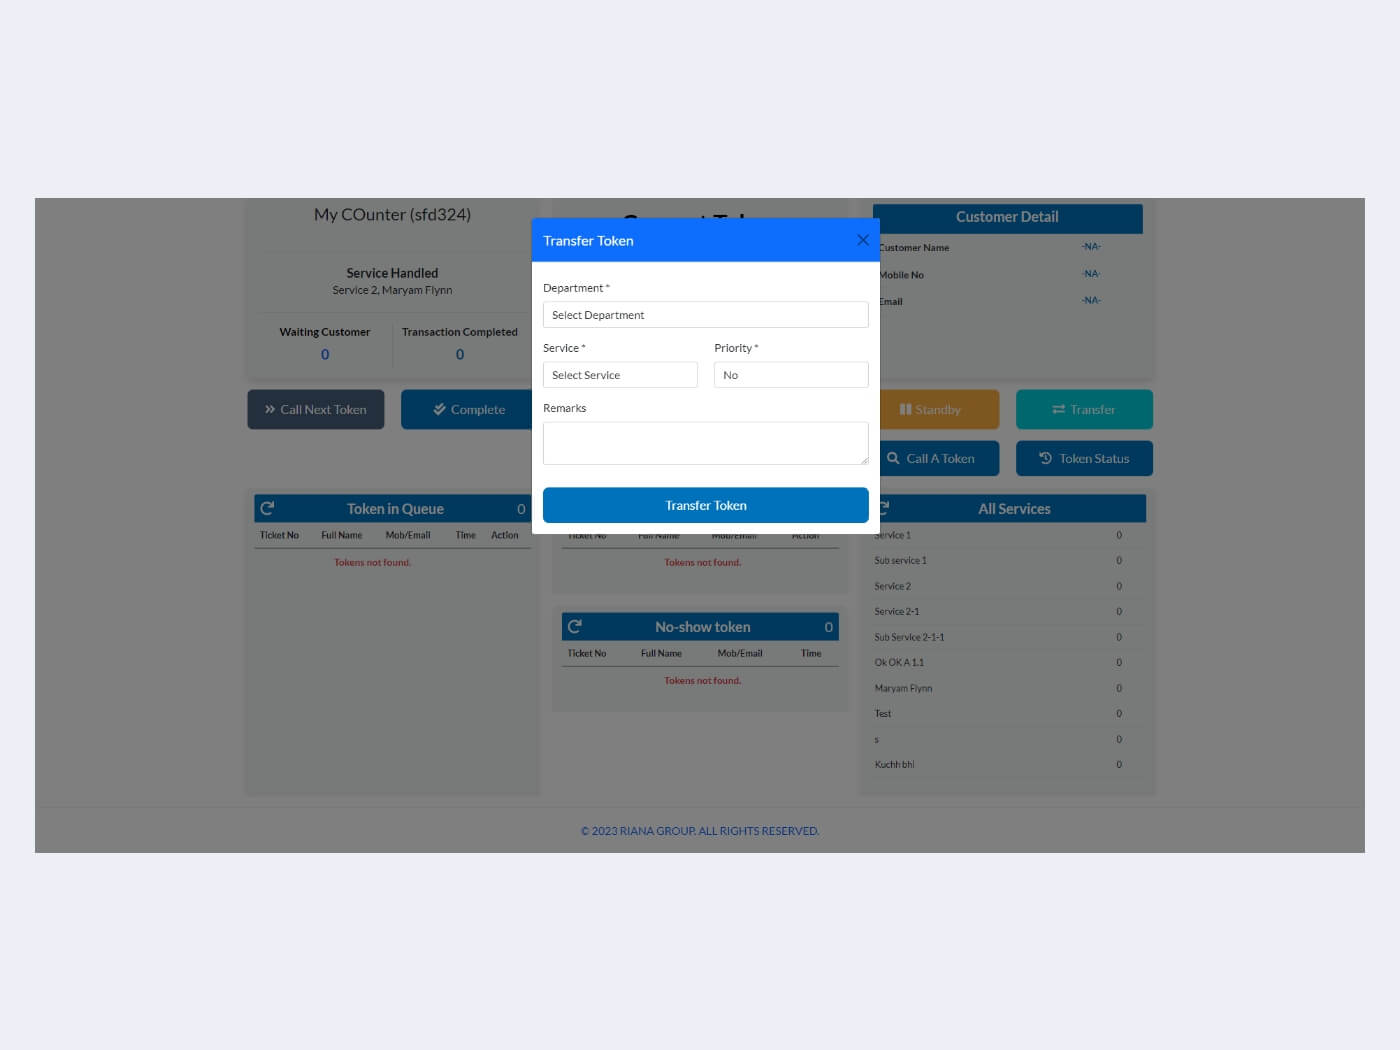
The operator can view the current serving token number along with the various details such as transaction time, current service, Elapsed time, and other remarks. The operator can take actions such as calling a token, Adding them in no-show, requeueing / skipping them, and so on for their specific counter.
Customer Details
The operator can view the details such as the name, number, and email address of the customer they are serving currently. The operator can put the customer on hold, transfer them to another counter, call a token manually, and check the token status to check their token history for their specific counter.
Token in Queue
The operator can view the total count of fresh tokens in the queue along with details such as token number, full name, mobile number, email address, and so on. The operator can refresh the list and call the token directly to call them forward for their specific counter.
Standby Token
The operator can view the list of standby tokens along with the details such as total count, token number, full name, mobile number, email address, and so on. The operator can refresh the list and call the token directly to call them forward for their specific counter.
No Show Token
The operator can view the list of No show tokens along with the details such as total count, token number, full name, mobile number, email address, and so on. The operator can refresh the list manually for their specific counter.
All Services
The operator can view all the services they are providing in their branch along with the total number of pending token counts.
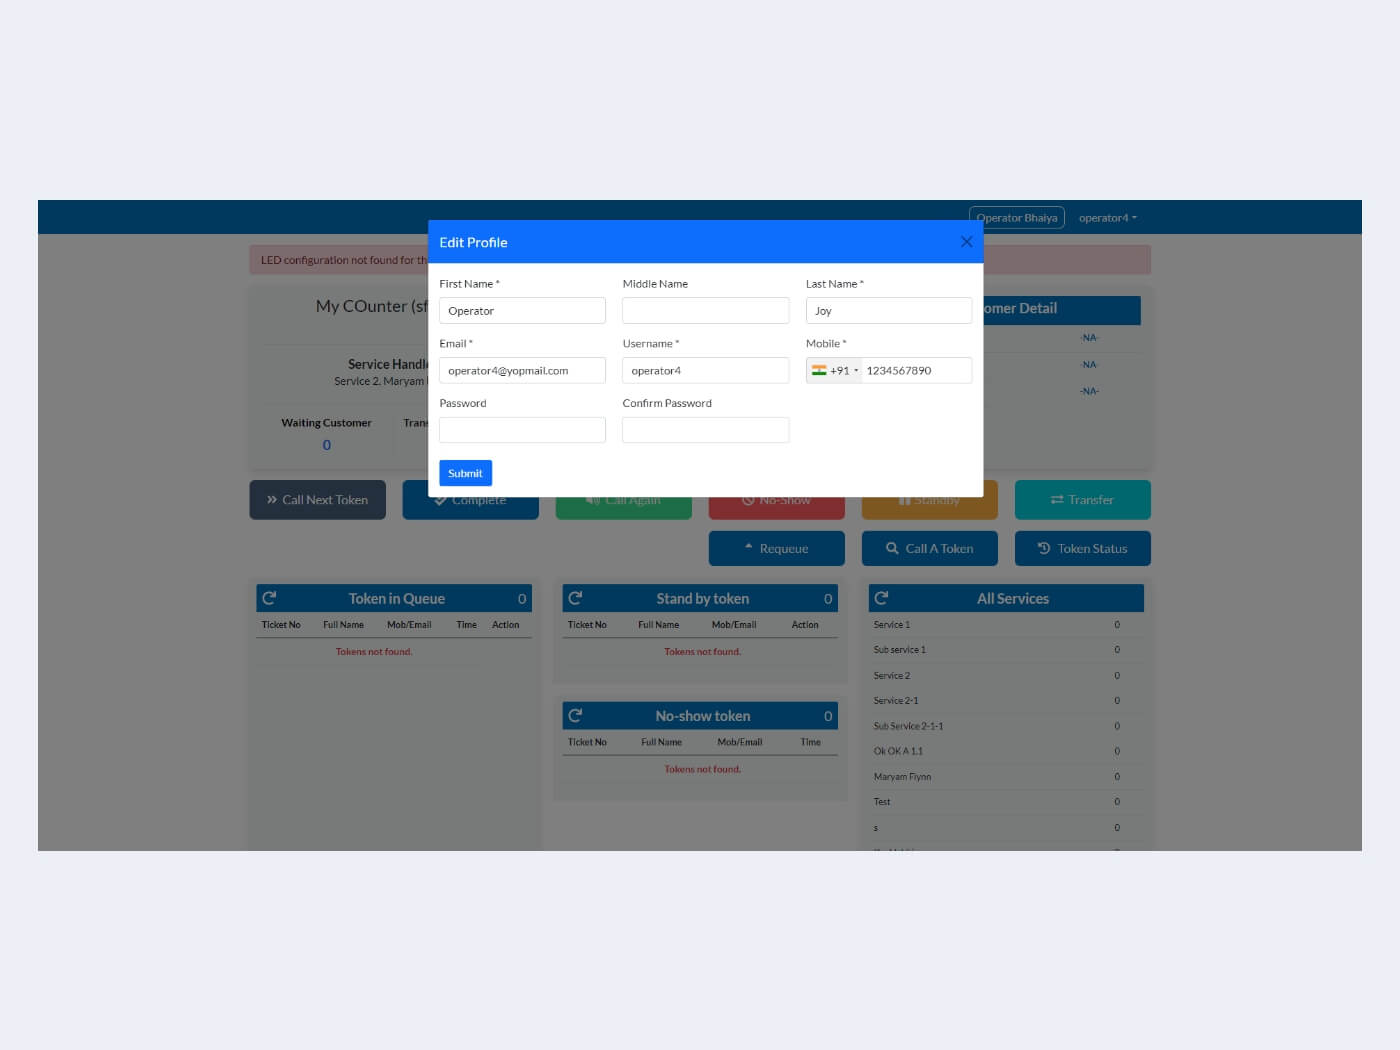
Operator Profile
The operator can log out from the profile and edit the profile along with the details such as first name, last name, Email address, username, mobile number, password, and more.
Features
Token Generation
Customer Information Generation
The user can add the details mentioned mandatory by the admin such as first name, last name, mobile number, email address, and so on to create tokens for the specific customer. They can opt to send the notification to the customers via SMS, Whatsapp, or email about their token status updates. The user can choose a different language for the Kiosk based on their preferences.
Kiosk Display
The user can choose the service the customer would like to opt for and create the token for the specific counter.
Token Generation
The user can create the token for the customer by choosing the counter number which can contain details such as the token number with the prefix, the message to display along with the option to print the token or not.
Print Token
The user can customize and print the token along with the details such as the organization name, service type, token number, message to display, date of creation, and more. The user can choose to print the token in portrait or landscape form.
Token Status Notification
The user can send notifications via SMS, email, or Whatsapp about the status of the token for different stages such as token creation, token call, token hold, token skip, and token close to customers along with basic details such as customer name, service name, token number, token status, and more.

Features
Cloud Admin Panel
Login
The Q-SYS admin can log in to the platform by entering their email addresses and password to access the Q-SYS dashboard details.
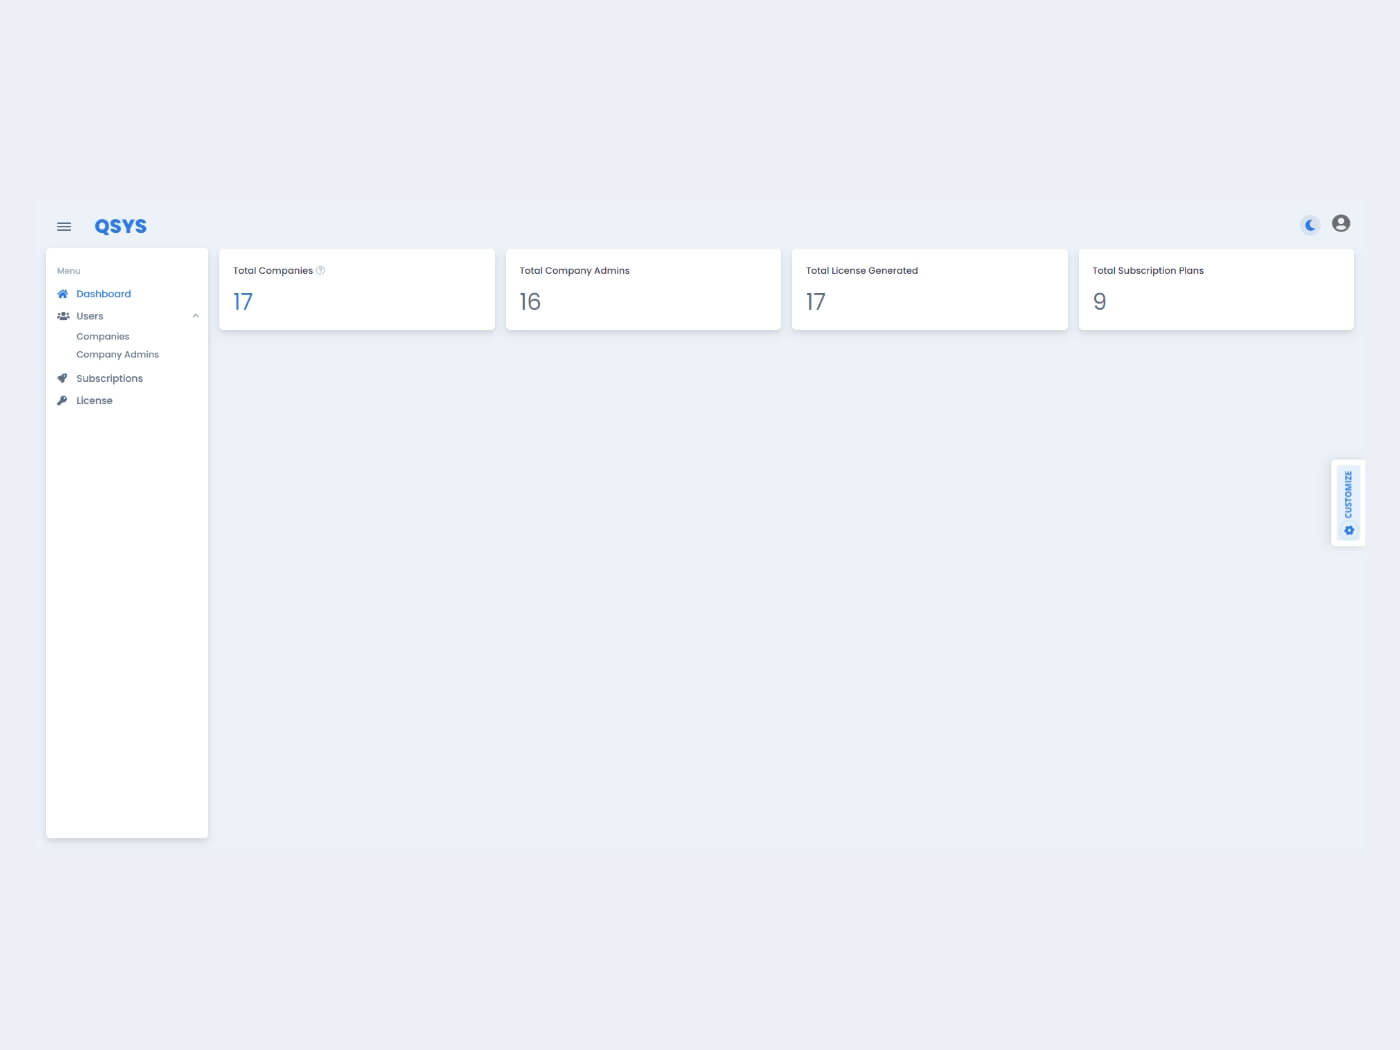
Dashboard
The Q-SYS admin can view various counts such as total companies, total company admin, total licenses generated, and total subscription plans generated for the Q - SYS system.
Menu
The Q-SYS admin can access various functionalities like the dashboard, users, company, company admins, subscription, license, and more through the menu section.
Users
The Q-SYS admin can view the company & company admins they serve through the Users tab.
Company Creation
The Q-SYS admin can create the company profile by entering details such as name, company code, email address, and mobile number to register the company.
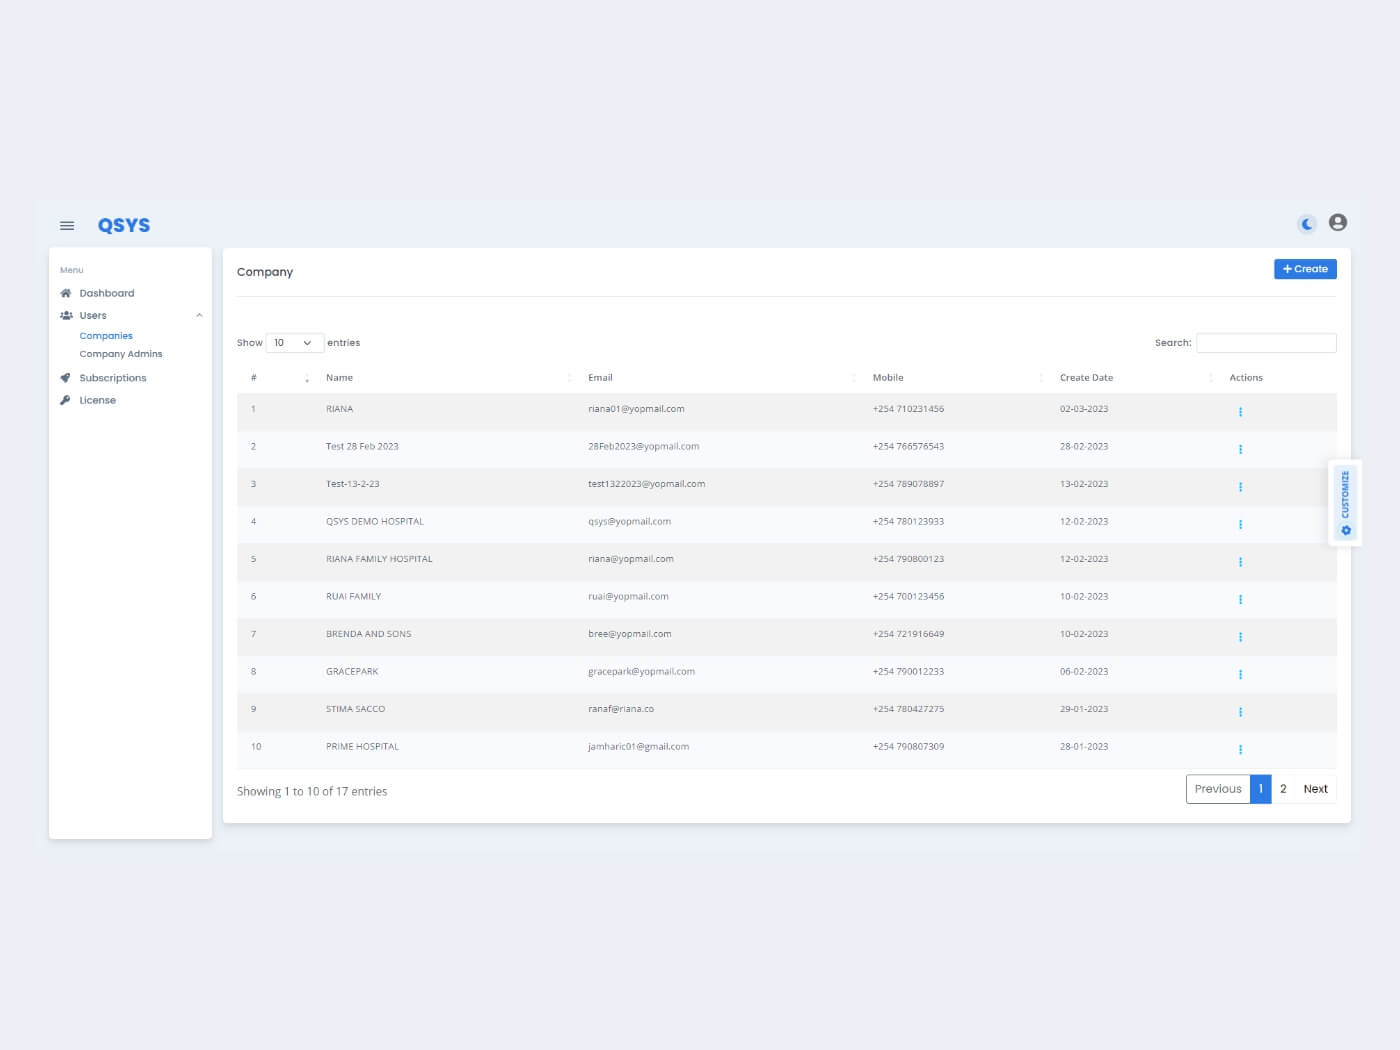
Company
The Q-SYS admin can add, update and view the company details such as company name, email address, mobile number, and account creation date who are registered to access the Q-SYS queue management platform. The Q-SYS admin can filter company details based on active and inactive status. The Q-SYS admin can view company details such as company name, email address, mobile number, code, creation date, update date, and more for any listed entry.
Company Admin Creation
The Q-SYS admin can create a company admin profile by entering various details such as company name, admin name, username, email address, mobile number, active or inactive status, password, and more.
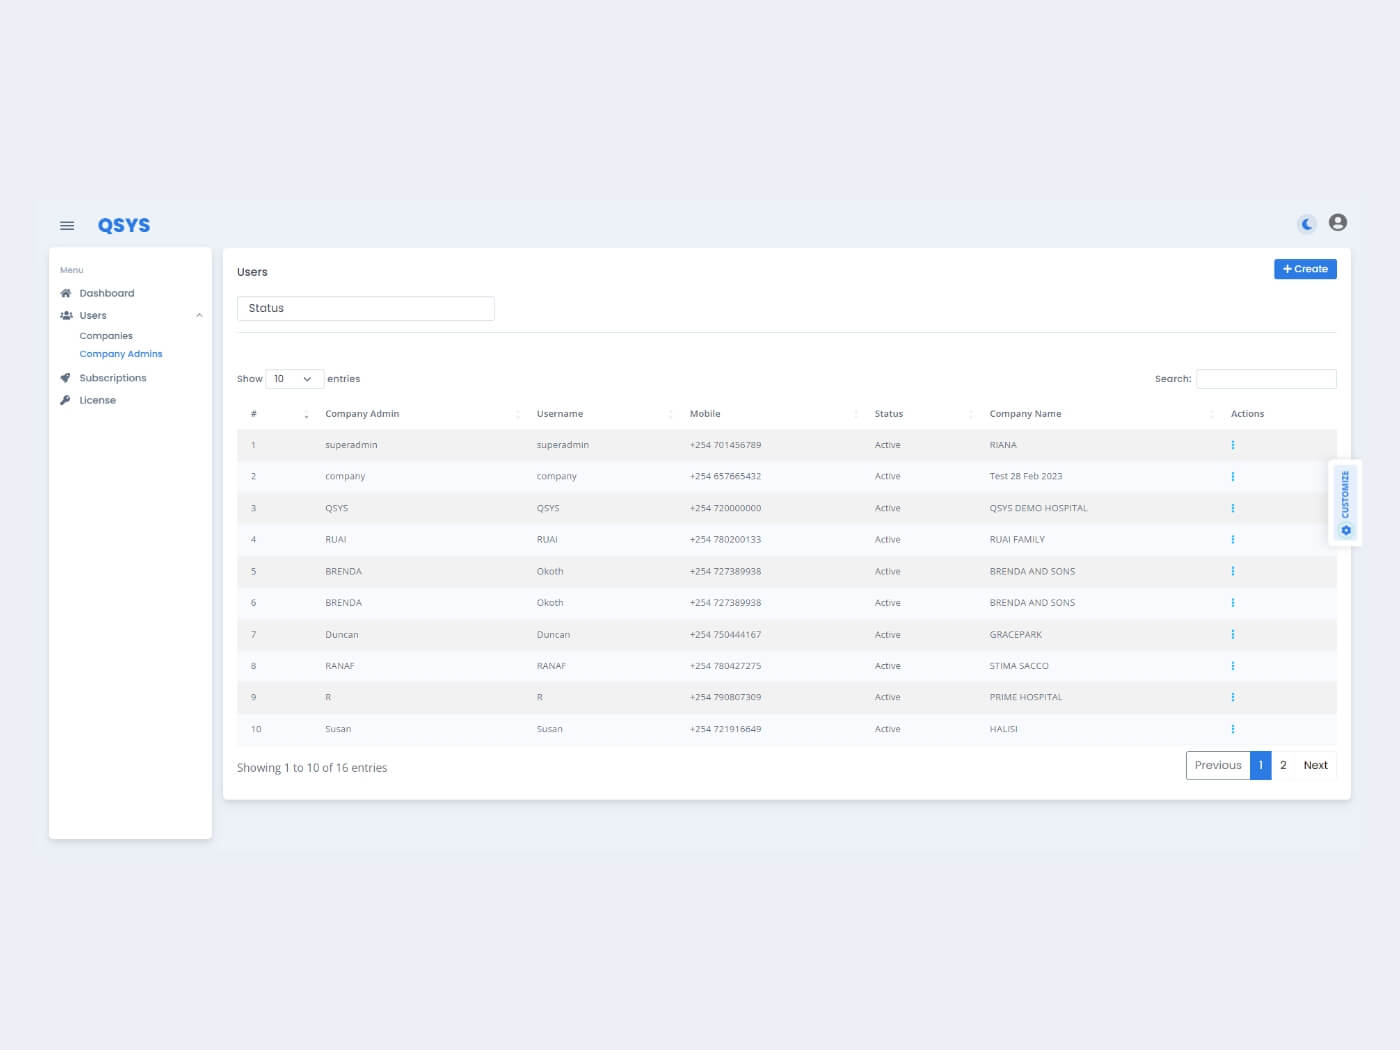
Company Admin
The Q-SYS admin can view, add and update the company admin profiles along with the details such as company admin, user name, mobile number, active or inactive status, and company name. The Q-SYS admin can filter company admin details based on active and inactive status. The Q-SYS admin can view company admin details such as company name, company code, admin name, admin username, email address, mobile number, status, creation date, update date, and more for any listed entry.
Subscription Creation
The Q-SYS admin can create a subscription by entering various details such as name, subscription type, price, subscription active days, and active or inactive status.
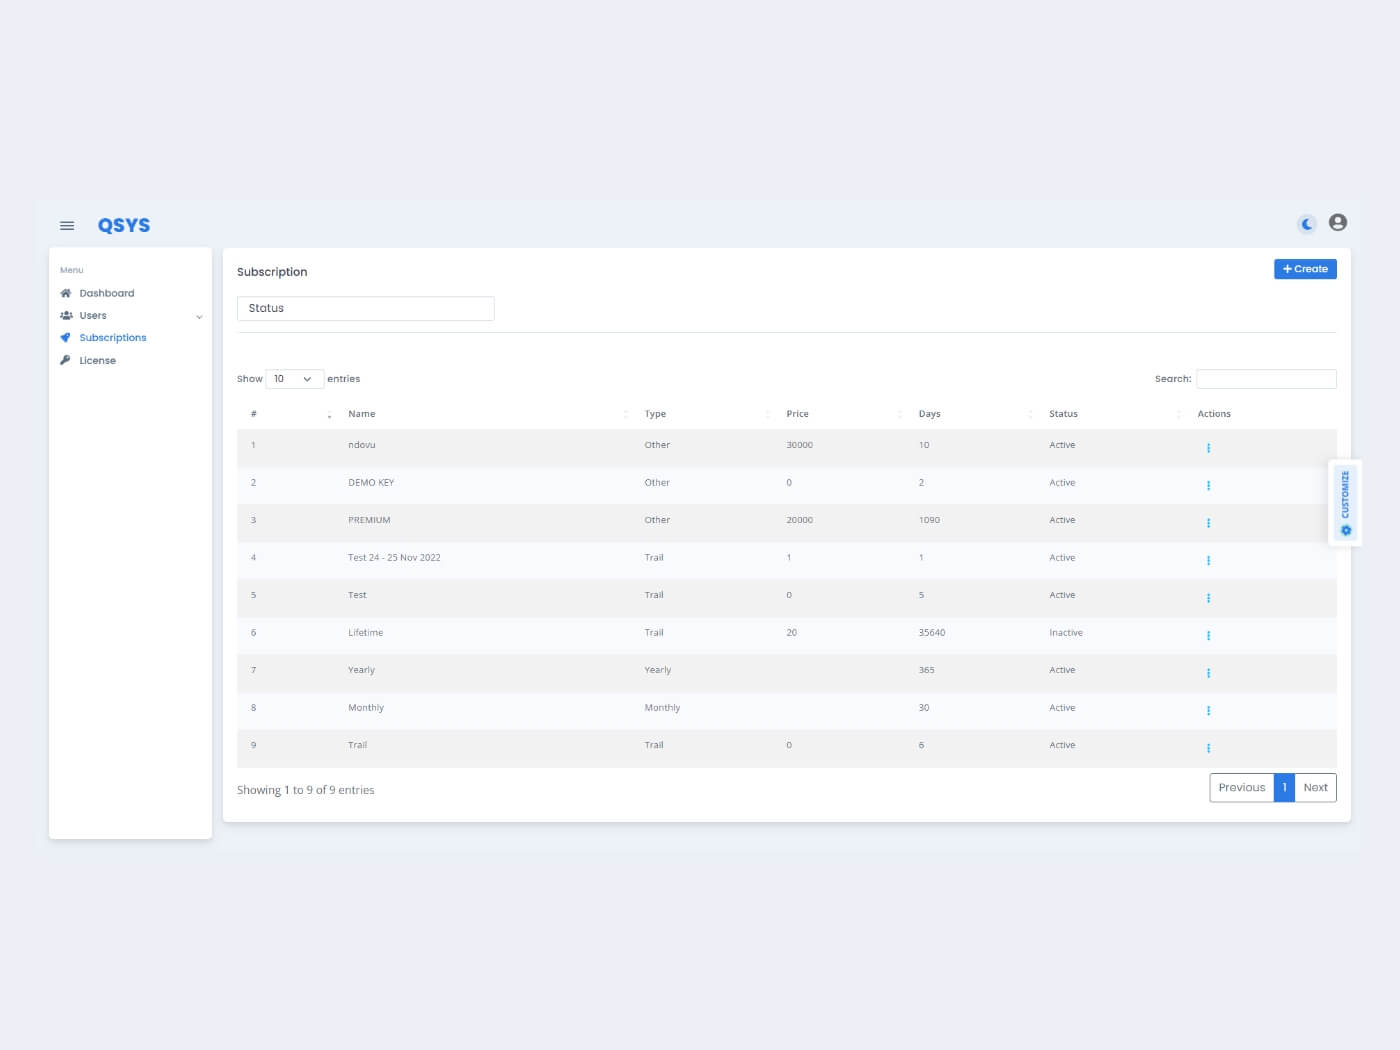
Subscriptions
The Q-SYS admin can view, add and update subscriptions along with the details such as name, type, price, days, and active and inactive status. The Q-SYS admin can filter and view subscription details based on active and inactive status. The Q-SYS admin can view subscription details such as name, type, status, creation date, update date, and more for any listed entry.
Subscription Creation
The Q-SYS admin can create a company license by entering various details such as company name, subscription plan, and MAC address.
License
The Q-SYS admin can view, add and update subscriptions along with the details such as company name, subscription name, MAC Address, Start date, end date, status, generated by, and create date. The Q-SYS admin can filter and view license details based on active, inactive, and expired date status. The Q-SYS admin can view license details such as license info, license history, and more for any listed entry.
Customization
The Q-SYS admin can customize their display preferences by changing Color Scheme, Layout, and Vertical Navbar Style based on their own preferences.
Profile Management
The Q-SYS admin can add, update and manage name, Email, username, mobile number, password, and various other profile details for the authorized users.
Logout
The Q-SYS admin can log out from the system through their profile sections.

Project Approach & Results
The web-based queue management system is a perfect solution to streamline every operation. Starting from the token generation to serve the customers and streamline their data. Along with this, the system should display accurate information on the connected LEDs for token number, counter number, and more.
So, our aim for developing a queue management system was to resolve all the issues that customers tend to face about their services and minimize the chances of errors for them. To begin with, we analyzed the concept hypothetically and created a file with the complete details covering all these points, diagrams, scenarios, problems, flow charts, and SRS for the entire workflow and planned the queue management system development process. After finalizing the document, In the third phase, based on the client's requirements and our findings, we defined back-end architectures for the queue management system. After that, Our team of designers started working on the prepared queue management wire-frames and system design. After getting approval, our team of developers started working on the hardware interface and software interface in the development phase. We created the prototype for the IoT-integrated system with all the native data. After the client's review and confirmation of the prototype, our team of developers started their development process by choosing the best-fit technology for this AI-integrated system that reflects the accurate details on LCDs and calling the tokens if clients agree to announce the tokens.
We chose CSS, HTML5, and JavaScript for front-end development, PHP/Laravel for the back-end development, and MySQL database for the database integration. The system shall support industry-standard relational databases (RDBMS). Our team of developers has used Laravel to leverage its more interactive support.
From requirement gathering to deployment, the queue management system development journey was full of challenges. However, our dedication and teamwork led us to deliver the solution successfully, as well as within the prescribed timeline & budget. After the development phase, our QA team tested the system before finally delivering it to the client.
Challenges
1. LED Configuration
An IoT configuration was a given challenge, but it was more crucial for LED, where we can show the current serving token. As every different hardware follows and accepts different patterned data, it was challenging for our developers to add and implement some sets of data patterns. Our developers worked tirelessly to successfully come up with a solution following and setting up the data format in Hexa set up the dynamic port number and used LED ID where we can display the current serving token on the LED display directly from the system.
2. Token Announcement
We have to announce the token numbers and services from the master display with perfect pronunciation so every visiting customer can understand the announcement perfectly. When we started working on the project, the token announcement was never really a challenging part; but it became challenging when different pronunciations came into the light. As the queue management system can be used globally, we had to take different global pronunciations into the consideration. Our developers handled the challenge very carefully. They used the browser's built-in library for pronunciation. For the announcements, they used Redis, and socket.io to fire and handle events on different master displays rather than calling them from the operator's display.
3. Token Printing Configuration
Token printing configuration was challenging as it had more customization based on customer demand. It includes various features such as whether they want the physical token or not; if yes, what service they are opting for, what counter they are at, font size, font color, logo printing, advertisement printing, and so on. After some discussion, our developers came up with a solution to allow the admin to handle these configurations and it reflected on the printing token.
Technology Stacks
We have used the latest technologies that can justify client requirements at the best to deliver bug-free solutions.


